Nick’s MOC Corner – 14/2
Hi Everyone, I hope you have all had a good week and if you have been building anything it’s going to plan or better still turned out as you imaged it. I’m currently trying to create a “large-ish” space themed build which has to be finished by the 22nd of this month so it’s really time I buckled down and got on with it but beach-combing for Lego and brick sorting seem to keep getting in the way or slowing me down. I hope to feature it here in the next few weeks,it’s progressing well and am sort of happy with it at the moment.
Last week I gave an insight into how my Record Store MOC was created and promised to go into more detail about the photography set up and editing of the picture so below is a little insight on how I work I’m not saying this is the best or the definitive way to take and edit but it’s what works best for me, but like any Lego subjects I’m more than happy to get tips and learn from others.
You don’t need to spend a fortune on lighting but it is one of the key aspects and can make or break a photograph, slowly over the years I’ve got bigger and better starting out with a basic light tent and lights which cost me around £20 to the lights I have now which are by PhotoSEL and cost around £120 they are a great piece of kit and give out some beautiful pure white daylight which stop any weird hues and shadows appearing on your Lego masterpiece. As my creations have got bigger I’ve stopped using a light tent and have now moved onto a state of the art roll of wallpaper as you maybe able to make out in the photograph below. Plain backing paper is best as it helps with both the lighting and makes the editing easier, I’ve also used a well ironed white bed sheet.

Once your set up and happy with the lighting your ready to shot Do double check that the model is dust and hair free and check nothing has been knocked or fallen over There’s nothing worst than getting that perfect shot and then noticing your cat has knocked a Minifigure over and left a few you a few of it’s hairs ! My camera of choice is a Nikon D3100 with a 10-20mm wide wide angle lens again this may not be the perfect set up but it’s what I’m happy using I use a tripod for larger work but love getting right in there so use use a steady had My top tip for the photography side is …Take loads of pictures Try loads of different angles Get in close and keep taking them the more the better there’s going to be that perfect shot somewhere in there. Do upload as you go to your computer to check the it’s set up as you want it, but don’t be afraid to use different setting it won’t hurt and you never know it maybe that perfect one.
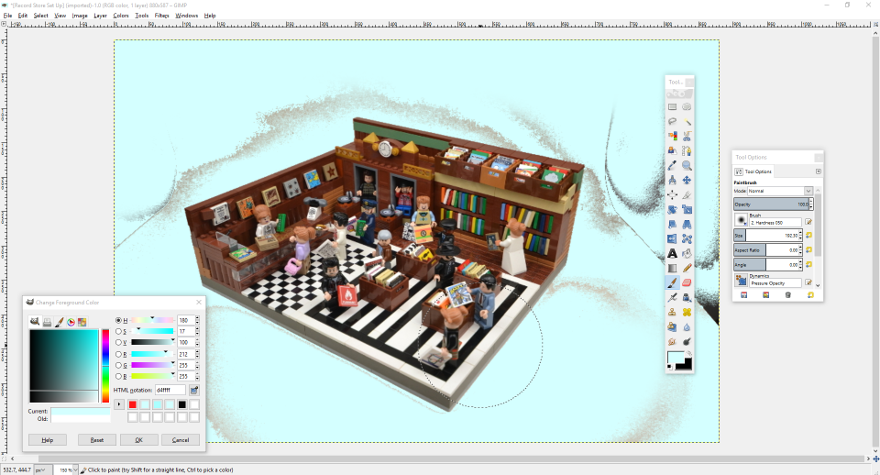
Once you have got that “perfect shot” there’s the little task of editing it As with anything there’s hundreds of photo editing programs out there from freeware to £1000+ super doper all whistles and bell with tea making facilities programs I use Gimp which is free and available here https://www.gimp.org/ it’s easy to use and you can get some great results. I won’t go into great detail on how to use Gimp there’s hints and tips and user guides on the internet I went in blind and learnt by my many mistakes.
 Editing work in progress using Gimp
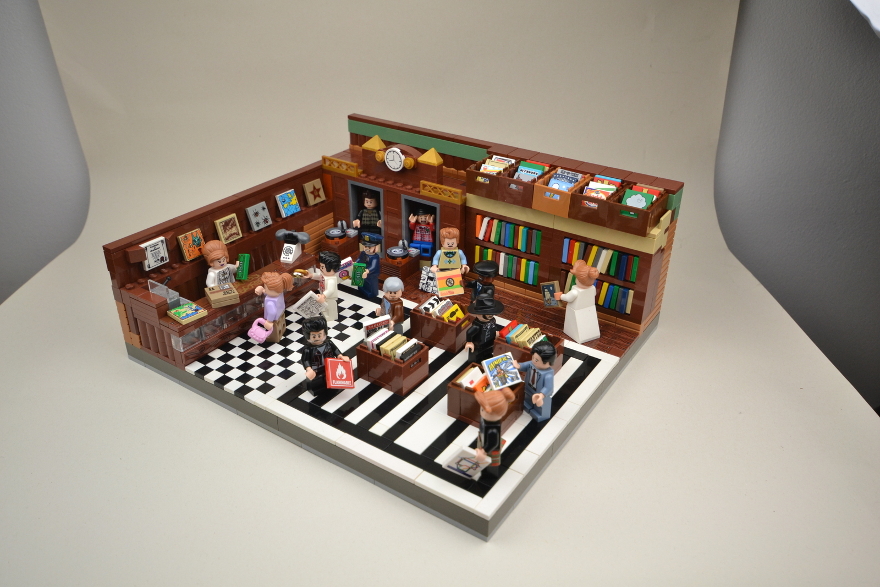
After a filling in the wallpaper area with a nice shade of blue a few tweaks here and there mainly lighting and sharpening it’s ready to post. I’m a big user of flickr and can be found here https://www.flickr.com/photos/legominifig/ I also post on Instagram and Twitter Once it’s posted sit back and wait it’s a great feeling getting Likes & Comments on a piece of work
Thanks for reading this was in no way a step by step tutorial, but more of an insight into how I work I’ll be back again next week by which time I’ll have hopefully completed my space build and posted a few pictures upon the web.
Until next time Happy Building and “Play Well”
Nick
Author Profile
- Hi I’m Nick also known as Minifignick I love anything and everything about Lego As I child I collected the Space theme, which at the age of 11 I stupidly sold the lot to fund “more grown up things” whatever they were I can’t remember. That then was the start of my “dark age” which lasted up until a visit to Legoland with my then 5 year old son. 9 years later I’m still loving the brick and create anything from medieval banqueting halls to 1950’s Record Stores.
Latest entries
 Builds29/05/2018LEGO Collectible Minifigures Series 18 Vignettes: Police Officer
- Builds23/05/2018LEGO Collectible Minifigures Series 18 Vignettes: Cat Costume Girl
- Builds20/05/2018LEGO Collectible Minifigures Series 18 Vignettes: Cactus Girl
- Builds18/05/2018LEGO Collectible Minifigures Series 18 Vignettes: Balloon Artist